Note* Security devices offer varying levels of deterrent, prevention and protection. No device or practice can guarantee 100% protection. Neither seller or manufacturer shall be liable for any loss or damage, direct, incidental or consequential arising from the use or the inability to use this product.


Computer Security

Paper Trays on Printers, Photo Copiers"
Suitable for:
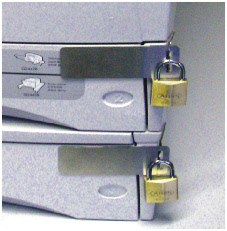
Most Laser Printers, Photocopiers and Ink Jet Printers with front loading paper trays, that can accommodate a two part overlapping locking mechanism (see Photo).
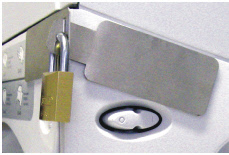
The mechanism is fitted with 3M Very High Bond (VHB) adhesive tape, and when attached correctly is extremely difficult to remove. The two parts should interlock allowing the fitting of a small padlock to effectively stop the sliding (opening) of the printer paper tray. May not be suitable for some printers.
Additional Parts required:
30mm or smaller padlock to lock the two plates together, (AM0031)
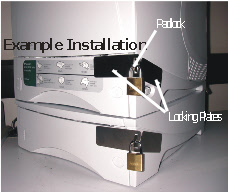
Laser Printer (typical installation)
- Determine Correct Location
- Carefully examine the paper tray location and operation, especially noticing the overlap of the paper draw (TRAY) and the side wall of its compartment. Assemble the two locking plates of the tray locking kit as they would be mounted on the printer. Do not remove the backing paper at this stage. Position the assembled mechanism in the most suitable location (see photos as a guide). Taking special notice that the location chosen is as flat as possible, yet still allow the operation of the paper tray. The plate with the rectangular slot must be mounted on the moving tray. The one with a hole, mounted to the side of the machine. When the tray is closed the hole plate passes through into the slotted plate allowing the padlock to be passed through the hole plate and be locked. Preventing the tray from opening. The plates are designed to have some ability to bend over some slightly curved surfaces. You may need to bend the plates slightly to match the curvature of the surface before mounting.
- Cleaning the Surface
- All new plastic surfaces are inherently oily. This oily film must be totally REMOVED using the alcohol wipes supplied and allowed to fully dry before attaching the plates. The Adhesive tape supplied can only achieve its’ maximum strength if the surface is oil free and as much surface comes in contact with the tape as possible. .
- Fitting
- When you have decided the best location and prepared the surface , remove the backing paper from the plates and press firmly into position. Special attention should be taken in applying firm pressure to as much of taped surface as possible. The is best achieved using your thumb. The more pressure the stronger the bond. The special adhesive tape reaches it maximum strength in 72 hours. Failure to follow these instructions will result in adhesive failure.
- Additional or Optional Mounting
- If the mounting location does not allow the best situation for the adhesive tape to offer enough protection, two 3-mm pop rivets can be installed using the supplied holes.
- We strongly recommend that drilling into the equipment and installing pop rivets be done by a qualified technician taking great care not to damage any internal parts.


Tools required: